FORCES STUDIES
Diagrams and explanations
First we did an approach to the forces that goes through the kayak and the paddle. Then we continue to study the forces in Katharina’s body and we ended studying the forces in the actual seat to see what was the better structure needed.
FORCES THROUHG THE KAYAK
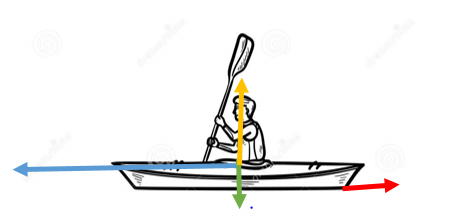
Normal force: any object, wholly or partially inmersed in a fluid, is buoyed up by a force equal to the weight of the fluid displaced by the object.
Linear displacement: uniform accelerated movement
Weight force: Katherina´s weight + kayak´s weight
Force of friction: resistence of water against the movement (also there is going to be another force of friction because of the resistence that the air is going to make against the kayak and the body of Katherina)
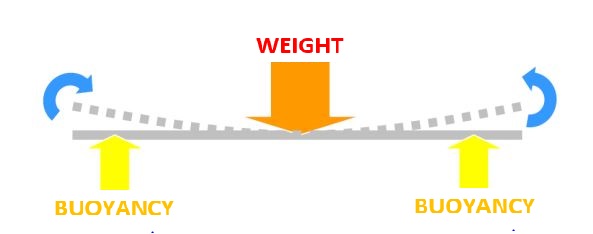
There are two major forces at work on a kayak at rest in the water. The weight of the paddler, his gear and the boat all add up to a force pushing down towards the center of the earth. This weight is supported by an equal and opposite force from the buoyancy of the water, which pushes up. It is the interaction of these two forces that are involved in stability. The relative distribution of the forces will determine whether a kayak is stable or not.
It’s combine all the weights in a kayak into a "center of gravity" (CG) or "center of mass" (CM) and all the buoyancy forces into a "center of buoyancy" (CB). This force is equal to the sum of the weight of the kayak plus the weight of Katharina (52+60), multiplied by the gravity, which is a total of 1097,6 N.
GRAVITY CURVE
BUOYANCY CURVE
The final result of the forces is:
FORCES THROUGH THE PADDLE
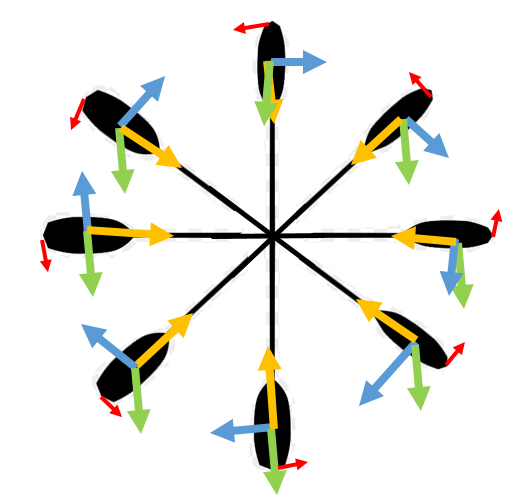
Force of friction: resistence of water against the movement (also there is going to be another force of friction because of the resistence that the air is going to make against the kayak paddle)
Weight force: weight of the paddle
Centrifugal force: the apparent force that is felt by an object moving in a curved path that acts outwardly away from the center of rotation.
Centripetal force: the force that it is needed to keep an object moving in a curved path and that is directed inward toward the center of rotation.
FORCES IN KATHARINA'S BODY
We are going to do an analysis step by step of the forces that appear while Katherina is paddling. First of all we are going to set the axis of the hips as the reference axis. It is important to remember that Katherina´s weight is going to be involve in all the diagrams highlighted in purple.
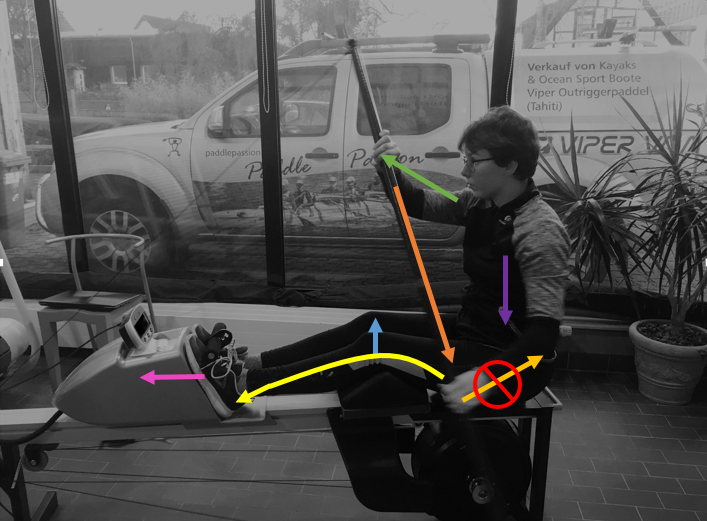
IMAGE 1
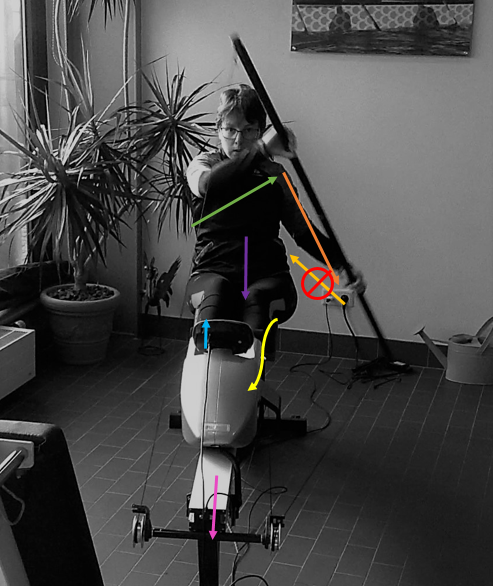
IMAGE 2
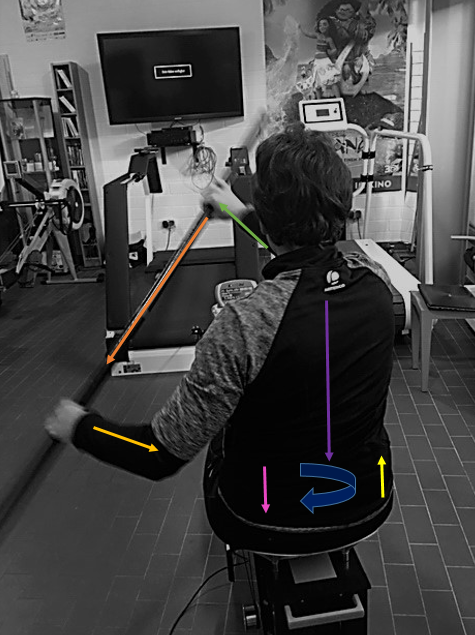
IMAGE 3
IMAGE 1 & IMAGE 2
The first situation that is going to be analysed is when the right hand is above head level. In this situation the movement goes as we are going to explain. The right arm is going to be extended pushing forward the paddle on the right side while the left side is going backwards but without a pulling force being involve, so the movement in the left side is going to be passive. At the same time the left knee is going to be slightly elevated by the passive force that is transmited from hips to feet. And feet will trasnmit the force to the kayak making it moving forward through water
The second diagram is exactly the same as the previous one but with another perspective.
IMAGE 3
Here we have the back side. We can see that the forces in the arms are the same that we have explain in the previous diagrams. But we did not analysed the forces that appear in the back. As we can see in the diagram the back will be rotating to left when the left part of the paddle is inside the water. This will make a movement that we can see in the picture. The right side will be slightly move upwards while the left side will be moving downwards. This movement in the lower part of the back will create a tension that is going to be transmitted throught the legs creating the passive movement in the knees that has been explained before.
EXPLAINING VIDEOS
VIDEO 1
VIDEO 2
VIDEO 3
The videos are slow motion to see how is the movement ejecuted
VIDEO 1 & VIDEO 2
We start the analysis when the right hand is down. Both hands are parallels to the hips and the arms are stretch towards the body. Then the right hand goes paddling to the height of the knee, at the horizontal line of the hips. When the hand is in this position the knee from the opposite site starts to go up in passive way. This moment is accompanying by the movement of the opposite leg, in this case the left leg. In the middle point of this movement the knee is going to be elevated and while the movement still advancing the knee will go back to its relax position.
VIDEO 3
From the back view, we start to analyse the movement when the left paddle is in the water. The left hand is at the height of the hip, and goes backwards. While the right hand passes the vertical axis of the body to the height of the opposite shoulder. From this point on, a change will happen that consists in the left hand going to begin to rise until reaching the previous maximum point that is at the height of the shoulder but in this case of the left. In addition, this movement is accompanied by a twisting of the back.
FORCES IN THE SEAT
For a kayak to be stable, there must be a balance between the force that is exerted downward due to the center of gravity, and the opposite that exerts the force of buoyancy.
When designing the kayak we must bear in mind that it must return to the position of vertical balance when we move. This can be controlled by manipulating the shape of the cross section of the kayak and the height of the seat.
Two boats with similar shapes and widths of water plane and detect a significant difference in the initial stability, probably due to the difference in seat height or some other factor that changes the height of the CG, like the difference between women and men.
The height of the seat. “Racing kayaks and wave skis have seats a half inch or more above those of touring sea kayaks. This makes them unstable by raising the paddler's center of gravity. A high seat also makes a kayak hard to roll.”
Once we knew this, we should know the forces specifically exerted on our seat.
For this we tried to simulate our seat in fusion 360, to see which were the most conflictive points.
Although we did not manage it, we read quite a lot about it, and from this we can draw the conclusion that the most conflictive points of our seat are the edges.
This is because its more angular shape makes it less resistant to weight.
However, these parts are not the ones that are going to support the main weight, rather they are the ones that are going to impede Katharina's movement.
For this reason, although they are more fragile areas, they do not support so much weight. After this we focused on the central part of the seat, where most of the weight will be concentrated and how we could attach this seat to the kayak.
By applying a passive static load (which represents the weight of a person), the chair begins to make a compressive effort in its smallest area, which corresponds to the regular section of the leg, its shapes redistribute the load and responds by generating a compressive effort towards the core of the leg, however since this force is reflected it is annulled and does not generate a cut.
In order to calculate the efforts in this case it would be necessary to establish the weight of a person, based on their mass, know the smallest diameter of the leg of the chair, where theoretically serious where a failure could occur.
s =N/A
Here the letter sigma (s), would be the effort of the material, N the weight in newtons of the person, and A the smallest circular area of the leg. obtained by its diameter.
Because of this we saw that although the seat material can be made of carbon fibre, the part of the joint has to be made of a stronger material. Because Katharina requires kayaking for, a lower kayak weight is better, we decided to use aluminum.
Finally the form of this union is in cross since it allows a greater distribution of the weight and gives a greater support to the structure. In addition to being a figure in cross, this one has triangles. Triangles in structures are better because they are less deformable and bear the weight better.